It was a typical Saturday morning when I noticed it—just a small, stubborn drip under my car. At first, I thought it was just some splash from the rain or maybe a tiny leak from the windshield wiper fluid. But as days passed, that leak grew into a steady, nagging puddle. Then came the dreaded realization: my oil pan was slowly, but surely, leaking from a well-known culprit—loose oil pan bolts.
Discovering the Frustration of Leaky Oil Pan Bolts
I’ve been around cars long enough to know that a leak from the oil pan can spell disaster if ignored. My first instinct was to head to the shop, but boy, those mechanic bills can add up quickly. Plus, I wanted to learn whether I could fix this myself without breaking the bank. That’s when the lightbulb went off—you don’t need expensive gasket kits or to replace the entire oil pan. Sometimes, a simple, cost-effective fix is all it takes.
Is the $15 Gasket Fix Really Worth It?
My initial skepticism was real—I’ve seen quick fixes that turn into more problems. But in my case, I made a rookie mistake early on: I didn’t properly torque the bolts when I first replaced the oil pan gasket. That small oversight turned into a slow leak. So, I decided to try the simple $15 gasket fix, which involves using a gasket sealer and re-tightening the bolts correctly. Turns out, it worked better than I could have hoped for! This experience taught me that with the right approach, you don’t need to shell out hundreds for a new gasket or oil pan.
Have you faced the frustration of a stubborn oil leak? If so, you’re not alone. And the best part? Fixing it yourself with a few affordable supplies can save you hundreds and give you peace of mind. But before jumping into repairs, it’s essential to understand why these leaks happen and how to prevent them from recurring.
Why Oil Pan Bolts Loosen and Cause Leaks
Time and heat cause bolts to settle or loosen over time, especially if they weren’t torqued properly during installation. This can lead to tiny gaps in the gasket, allowing oil to seep out slowly. To tackle this, I recommend checking your oil pan bolts periodically, especially if you notice any signs of leaking or burning oil smell. Proper torque is key—using a torque wrench ensures each bolt is tightened to the manufacturer’s specifications.
Now that we’ve covered the why and the initial mistake I made, let’s explore the straightforward steps to fix those pesky leaks and keep your oil inside where it belongs. Trust me, once you’ve done this fix, you’ll wonder why you ever paid for expensive repairs when a simple, strategic approach does the trick.
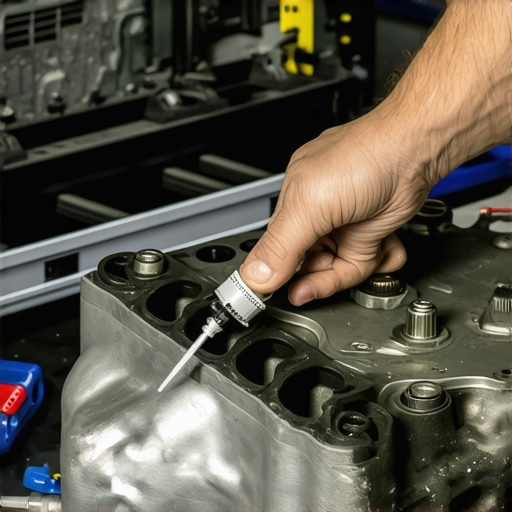
Remove the Oil Pan for Inspection
Start by safely lifting your vehicle using a jack and stands. Drain the engine oil to prevent mess, then carefully unbolt the oil pan using a socket wrench set. As I did last summer, I used a rubber mallet to gently loosen stubborn pans, avoiding damage to the gasket or pan edges. Once removed, examine the gasket and bolts for signs of wear or corrosion. This clear access allows you to see if the bolts are truly loose or if the gasket has failed.
Clean and Prepare the Surfaces
Thoroughly clean the mating surfaces of the oil pan and engine block with brake cleaner or gasket cleaner. Removing old gasket residue ensures a perfect seal. I used a plastic scraper, avoiding metal tools that might scratch surfaces, which can lead to future leaks. Wipe everything dry with a lint-free cloth and double-check that no debris remains, as splinters or dirt can cause improper sealing.
Re-Torque the Bolts Correctly
Apply a high-temperature thread locker to the bolts if recommended by your vehicle’s manual. Place the oil pan back and finger-tighten the bolts to hold it in place. Using a torque wrench, tighten the bolts in a crisscross pattern—this ensures even pressure distribution. Consult your car’s repair manual for torque specifications, typically around 15-20 ft-lb. During my repair, I used a torque wrench calibrated to manufacturer specs, which prevented over-tightening that ruined the gasket.
Double-Check Bolt Tightness and Seal
After initial torquing, go around the bolts again to confirm they are all evenly tightened. Run your hand along the bolts to feel for tightness consistency. Align the gasket perfectly, checking for any pinches or folds. If needed, reposition the gasket before reassembling. Remember, proper tightening prevents future leaks and extends the gasket’s lifespan.
Refill Oil and Verify the Fix
Reinstall the oil pan carefully, ensuring the gasket stays aligned. Tighten the bolts to spec and refill with the appropriate engine oil. Start the engine, let it run for a few minutes, then inspect under the vehicle for leaks. Wipe around the bolts to see if oil appears. I once missed a step here, which caused a slow drip; double-checking your work saves time later.
Finally, I recommend checking your oil level after a few days to ensure there are no hidden leaks. Regular inspections help catch bolt loosening early, preventing bigger issues down the line. For those interested in preventive measures, sealing techniques and specialized thread lockers can be explored further in articles like this guide on transmission maintenance.
Many car enthusiasts and everyday drivers share common misconceptions about vehicle maintenance, often leading to costly mistakes. While most believe that a routine service or simple tune-up is straightforward, there’s a layer of nuance that even seasoned owners sometimes miss. Let’s dig deeper into what most people get wrong about auto repair and servicing, particularly concerning transmission health and collision repairs.
Are ‘Quick Fixes’ Always Foolproof? Think Again
It’s a common myth that quick fixes, like replacing a plastic clip or topping off fluids, solve the root cause of issues. For example, a worn plastic throttle clip might seem insignificant but can lead to uneven acceleration or idle problems if not addressed properly. Relying solely on superficial repairs can mask underlying problems, resulting in worsening conditions over time. The key is understanding the hidden role of small components and inspecting beyond the surface.
Why Your Transmission Might Be More Than Just Slipping
Many believe that transmission issues are always noticeable through harsh shifting or slippage. However, vehicles often exhibit early warning signs like subtle delays or unusual noises that go unnoticed. A critical nuance is the buildup of a hidden screen inside your transmission that can clog and cause erratic behavior. Ignoring these signs can culminate in complete transmission failure, which is why regular inspections of internal filters and fluid quality are vital. Check out this guide for insights into this often-overlooked aspect.
Advanced mistakes also include neglecting the importance of correct fluid levels or using incompatible additives, which can deteriorate clutch materials or other sensitive parts. Automotive expert Mark Williams emphasizes that even small deviations from manufacturer specs can accelerate wear and tear, leading to expensive repairs. So, a meticulous approach to transmission maintenance isn’t just for enthusiasts—it’s essential for long-term reliability.
Crucial Maintenance Traps That Snare Even Experienced Owners
Many owners fall prey to ignoring the importance of proper fluid flushing or overlooking signs of early wear, such as fluid discoloration or foul smell. For instance, failing to flush the cooling system periodically can lead to corrosion and reduced heat transfer efficiency, risking engine overheating. A proper cooling system flush, as detailed here, prevents costly repairs down the line.
Another nuanced mistake is underestimating the significance of minor steering issues. A whining power steering pump or a steering wheel that feels uneven can indicate internal damage or leaks that, if ignored, compromise safety and handling. Similarly, neglecting small signs of exhaust leaks or subtle vibrations can escalate into major component failures.
Don’t overlook the importance of regular, detailed inspections. Studies show that proactive diagnostics significantly reduce overall repair costs and extend your vehicle’s lifespan. So, instead of waiting for symptoms to worsen, a strategic approach—like periodically checking for leaks or abnormal noises—can save you from major headaches.
What Can Advanced Auto Repairs Teach You?
Complex repairs often hide the simplest solutions. For example, an intermittent electrical fault might be fixed by locating a hidden ground wire—an issue many overlook because it’s not immediately apparent. Awareness of such nuances can prevent unnecessary part replacements and guide you toward smarter repairs.
In conclusion, understanding the deeper layers of vehicle maintenance and repair—beyond surface fixes—empowers you as an owner and can dramatically reduce costs and downtime. Would you like to see a step-by-step guide on inspecting your transmission’s hidden components? Let me know in the comments or check out this detailed article for more insights.
Maintaining your vehicle over time is both an investment and a commitment. Having the right tools and establishing effective routines can significantly extend the lifespan of your car and reduce costly repairs. One essential piece of equipment I rely on regularly is a high-quality digital torque wrench. Unlike standard torque wrenches, my digital model allows precise tightening of bolts, especially critical when working on components like transmission or suspension parts, where even slight over-tightening can cause damage. This tool has been invaluable, particularly during procedures such as re-torquing transmission bolts, which must be torque-spec’d to avoid future issues.
Another device I swear by is a code scanner. Modern cars are equipped with an array of sensors and modules, and a reliable scanner helps me diagnose issues quickly without jumping to conclusions. When maintaining systems like the power steering pump (which, as I’ve experienced, can emit a whining noise if not checked regularly), a scan tool can detect underlying sensor or module faults early, saving time and money.
Routine inspections also benefit immensely from a magnetized inspection mirror. It allows me to peek into tight spaces—like behind the engine or inside wheel wells—to spot leaks or debris. For instance, catching early signs of strut leaks before they degrade driving comfort is a game-changer. Pairing this with a bright LED flashlight ensures I don’t miss subtle issues.
When it comes to fluids, I prefer to use a digital fluid tester. These testers measure the actual temperature and viscosity of liquids like transmission fluid or coolant, providing a more accurate picture than just checking the color or smell. This approach has helped me identify impending problems, such as a clogged transmission screen (which, as outlined here), before the symptoms become severe. Staying proactive with these tools ensures your vehicle remains reliable for the long haul.
Looking ahead, I predict that smart diagnostic systems and integrated repair apps will become standard for DIY enthusiasts. Imagine having your vehicle’s health data synced to your smartphone, guiding you through maintenance steps with step-by-step alerts. For example, apps that can interpret code scanner outputs and recommend repairs are already evolving, making auto maintenance accessible even to beginners.
Ever Wonder How to Maintain Your Vehicle Efficiently Over Time?
The key is establishing a regular maintenance schedule using reliable tools. Check fluid levels monthly with digital testers, inspect belts and hoses with an inspection mirror, and use a code scanner annually, even if warning lights aren’t on. It’s about catching problems early—like a sneaky transmission grinding—before they turn into costly repairs. By deploying these specific tools and routines, you can keep your car in top shape and avoid surprise breakdowns. Try integrating a digital torque wrench into your next project—it’s a small investment that pays off by preventing damage and ensuring proper assembly. Consistency and the right equipment are your best allies for long-term automotive health.
The Hardest Lesson I Learned About car service,tune up,auto repair,transmission,collisionfixer
One of my most eye-opening experiences was realizing that sometimes, the simplest fix is hiding in plain sight. After replacing a valve cover gasket, I neglected to double-check the torque specifications. The result? A slow oil leak that cost me extra time and money. That moment taught me the importance of meticulous attention to detail—trusting the manufacturer’s torque specs and not rushing through critical steps. It’s a reminder that in auto repair, patience and precision often trump quick fixes.
3 Myths About car service,tune up,auto repair,transmission,collisionfixer That Held Me Back
- Myth 1: You can ignore small leaks.
Reality: Even tiny drips can lead to bigger, more costly problems over time, especially with vital fluids like transmission or brake fluid. - Myth 2: Kicking the can down the road saves money.
Reality: Delaying routine maintenance can turn minor issues into major repairs. Regular inspections save you stress and expense. - Myth 3: DIY fixes are always cheaper.
Reality: Without proper tools or knowledge, DIY repairs can sometimes cause more harm than good. Educate yourself and know your limits.
What Experts Won’t Tell You About car service,tune up,auto repair,transmission,collisionfixer
Often, the most overlooked aspect of auto repair is understanding the internal components of your vehicle. For example, hidden transmission screens can clog and cause shifting issues if not checked periodically. These small but crucial details can make all the difference in maintaining vehicle health. Learning to recognize early warning signs—like subtle vibrations or unusual noises—can prevent costly breakdowns. And remember, trusting quality resources and tools, like a good guide on transmission maintenance, can empower you to handle many repairs yourself.
My Essential Toolkit for car service,tune up,auto repair,transmission,collisionfixer
Having the right tools has revolutionized my approach to car repair. A high-quality digital torque wrench ensures bolts are tightened accurately, preventing future leaks or damage. A reliable code scanner helps me interpret vehicle codes quickly, especially when diagnosing issues with components like the power steering pump, which I detail here. Additionally, an inspection mirror allows me to peek into tight, hard-to-see spaces for early detection of leaks or corrosion—crucial for maintaining systems like the cooling or braking systems. These tools aren’t just gadgets; they’re investments in confidence and long-term vehicle health.
Your Next Step: Shop Smart, Fix Smarter
Understanding that the road to reliable vehicle maintenance is ongoing, I urge you to adopt a proactive mindset. Regularly check fluid levels with digital testers, inspect belts and hoses with a mirror, and use a code scanner annually—even if your dashboard stays silent. Implementing consistent routines using trusted tools helps prevent minor issues from escalating. Remember, every small step you take today—like re-torquing oil pan bolts properly or inspecting your transmission—pays dividends in peace of mind tomorrow. Your car deserves this level of care, and you’re capable of providing it. So, what small maintenance task will you tackle this week to keep your vehicle in top shape? Let me know below.