I remember the day my car started acting up—rough idling, sluggish acceleration, and a strange hissing sound that seemed to echo my frustration. It was late afternoon, and I was already late for an appointment. Frustration turned to concern when I realized my fuel efficiency was plummeting, and the engine was running poorly. I knew I needed a quick, cost-effective fix, but didn’t want to spend hours or a small fortune at the shop.
That led me to a lightbulb moment—using just a simple bottle of dish soap and some water to track down the sneakiest of problems: vacuum leaks. At first, I was skeptical. How could so cheap and simple a method actually work? But after some initial research and a bit of trial and error, I discovered that this old trick can be incredibly effective, especially for those of us who prefer DIY repairs without breaking the bank.
Today, I want to share that experience with you. If your engine is misfiring, your fuel economy has taken a nosedive, or you just want to ensure your car runs smoothly, this method could save you time and money. And yes, it’s so straightforward, you could do it in your driveway.
Why Finding a Vacuum Leak Matters More Than You Think
Vacuum leaks are often overlooked but can cause serious issues like poor engine performance, increased emissions, and even damage over time. They occur when there’s a gap or tear in the vacuum hoses connected to your engine, allowing unmetered air to enter the system. This disrupts the air-fuel mixture, leading to inefficiencies and potential damage.
Surprisingly, according to the Environmental Protection Agency, simple vacuum leaks are responsible for around 25% of engine performance problems in cars older than ten years. Tackling this problem early with easy tools not only restores your vehicle’s health but also extends its lifespan.
Have you ever experienced that sudden change in engine behavior and wondered if something was just loose or broken? If so, you’re not alone—and the good news is that with a basic soap solution, you can identify these sneaky leaks yourself.
Now, let’s dive into the step-by-step process. For a detailed guide, you might want to also check out some related car maintenance tips, such as how to reset your oil life monitor or how to spot a failing wheel bearing early. But for now, let’s focus on the soap-and-water trick that can save you hundreds in repairs.
Preparing Your Workspace and Tools
First, find a flat, well-lit area where you can work comfortably, ideally with your engine cool to avoid burns. Gather supplies: a clean spray bottle filled with water, a few drops of dish soap, and a flashlight. I remember one sunny Saturday when I set up in my driveway, laying out my tools and getting ready for the leak hunt. This preparation makes the process smoother and prevents unnecessary interruptions.
Locating Potential Leak Points
Identify all vacuum hoses connected to your intake manifold and other engine components. Look for cracked, brittle, or disconnected hoses—these are common leak sites. I once found a cracked hose behind the engine, hidden from plain sight, which caused my engine’s hesitation. Carefully inspect each hose for damage, as even tiny tears can cause significant issues.
Visual Inspection Tips
Use your flashlight to check for soot or oil residue around hose connections, indicating leaks. If you notice any, mark them for testing. Remember, tight fittings can still leak if the clamp is loose or corroded. Don’t forget to examine the intake manifold gasket area for signs of wear.
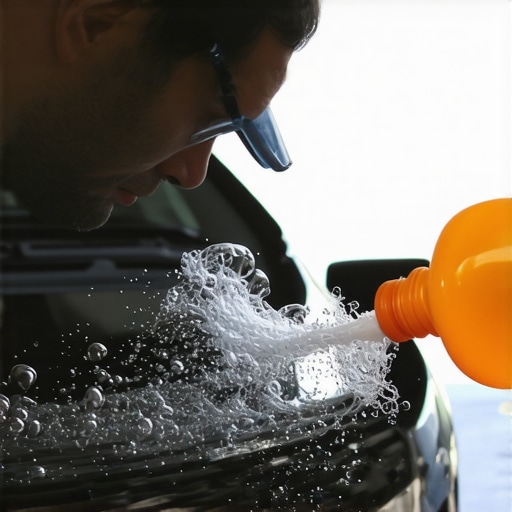
Applying the Soap and Water Test
Mix a small amount of dish soap into the water in your spray bottle. Shake gently to combine. Starting the engine, spray the soap solution liberally onto each suspect hose and connection while the engine runs. I once had a stubborn leak behind the throttle body; applying the soapy water revealed tiny bubbles forming at the crack, confirming the source.
Detecting the Leaks
Watch carefully as bubbles form. If you see continuous bubbling at a particular connection or crack, you’ve identified the leak point. Keep in mind that leaks can be small but still impactful, so thorough coverage is essential. Also, note that high engine idle speeds can cause more pronounced bubbling, making leak detection easier.
Final Checks and Repairs
Once a leak is found, turn off the engine and tighten the clamp or replace the damaged hose. For small cracks, epoxy or specialized rubber repair kits can sometimes do the trick, but replacing the hose is more reliable. After repairs, repeat the soap test to ensure the leak is sealed. I once fixed a hose with a quick rubber patch, tested again, and saw no bubbles—saving me from costly shop repairs.
Extra Tips for Success
Always work in a well-ventilated area and wear gloves if possible. For persistent leaks, consider checking the intake manifold gasket or PCV valve, as they can also cause vacuum issues. Don’t forget, if you want to fine-tune your engine’s performance further, checking your spark plugs and fuel system can complement this leak detection process. For instance, inspecting your spark plugs for fouling is crucial, especially if your car has been running rough lately. Learn more about this process at this guide on spark plug fouling.When it comes to vehicle maintenance and repairs, many car owners operate under misconceptions that can lead to costly mistakes and subpar outcomes. One common myth is that all auto repair shops deliver the same quality service, but in reality, the expertise and transparency vary widely. For example, some shops may push unnecessary repairs, especially on complex systems like transmissions, to inflate their bill. It’s crucial to seek proper diagnostics—know that resetting your oil monitor or understanding how to identify signs of a failing component can save you from overpaying for services you don’t need.
A significant nuance most overlook is the importance of accurate diagnostics—superficial checks often miss underlying issues like hidden corrosion or electrical faults. Take transmissions: many believe that if it shifts, it’s fine, but internal components might be worn out even without obvious symptoms, leading to later, more expensive failures. Advanced diagnostics, such as computer scans, can unearth these hidden issues before they escalate.
Beware of the trap of neglecting routine maintenance like tune-ups; many drivers postpone these, only to face bigger problems down the line. Regularly resetting the oil monitor or checking spark plugs can keep the engine running smoothly, but some think these are unnecessary if the car seems fine. That’s a dangerous assumption, as minor issues can snowball into major repairs.
Advanced mistakes also include misinterpreting symptoms—assuming a rough ride always indicates brake issues, when sometimes the culprit is a failing suspension component or even tire imbalance. For example, a bad wheel bearing might cause vibrations but is often mistaken for brake problems. Recognizing these subtle cues requires experience, which professional diagnostics provide.
Finally, a little-known fact is that many auto repairs are influenced by the quality of aftermarket parts used. Poor-quality replacement parts can cause performance issues or early failure, costing you extra. Always ensure your mechanic sources parts from reputable suppliers—your car’s longevity depends on it.
Have you ever fallen into this trap? Let me know in the comments. The more you understand these nuances, the better prepared you’ll be to make informed decisions and avoid unnecessary expenses with your vehicle’s care.
Maintaining your vehicle’s performance over the long haul requires more than just basic knowledge—it demands the right tools, a systematic approach, and an understanding of how to address issues promptly. As an enthusiast and experienced DIY mechanic, I’ve found that investing in specific equipment not only saves time but also ensures precision in repairs and maintenance.
Investing in Quality Diagnostic Equipment
One of the best investments I’ve made is a reliable automotive code scanner, like the OBD2 scanner. I personally use a device that connects via Bluetooth to my smartphone, enabling me to easily read and clear fault codes. This tool has been invaluable for quickly diagnosing issues such as engine misfires or transmission errors without rushing to a mechanic. When I encountered my car’s hesitation after refueling, the scanner helped me pinpoint the culprit sensor, saving me from costly diagnostics.
Using Specialized Hand Tools for Precision
For routine maintenance and repairs, I rely on specific hand tools like a torque wrench and a vacuum pump. The torque wrench ensures I tighten bolts to manufacturer specifications, which is critical for components like the transmission or wheel hubs. Meanwhile, the vacuum pump helps me properly bleed brake systems or test for vacuum leaks during minor engine tune-ups. I always keep my tools organized in a sturdy toolbox, making ongoing projects faster and more efficient.
Maintaining with Software Monitoring
Beyond hardware, software plays a pivotal role. I use vehicle-specific diagnostic apps that interface with my OBD2 scanner, providing detailed live data about sensors and engine behavior. Monitoring parameters like fuel trim or ignition timing helps me preempt issues, especially when planning larger service intervals like resetting your oil monitor or evaluating the need for a transmission fluid change.
Preparation Tools for Reliable Repairs
Having a well-stocked set of consumables—such as gloves, rags, and specialty lubricants—ensures clean and effective repairs. For example, I keep a dedicated bottle of silicone lubricant for sealants, which proves handy when replacing vacuum hoses or assembly connections. Proper preparation minimizes mistakes and extends the lifespan of your fixes.
Predicting the Future of Auto Maintenance
Looking ahead, I believe the integration of AI diagnostics and automated repair systems will revolutionize vehicle upkeep. As cars become more sophisticated, so will our tools—think intelligent scanners that predict failures before they happen, minimizing downtime and repair costs. Staying updated on technological advancements ensures that your maintenance routine remains effective and efficient.
How do I maintain tools and systems over time?
Regular calibration and proper storage of your tools are vital. For instance, I calibrate my torque wrench annually to maintain accuracy and store my diagnostic devices in moisture-controlled cases. Also, updating your diagnostic software ensures compatibility with newer vehicle models. Embracing these maintenance habits guarantees your tools remain dependable when you need them most. To truly test your skills, try diagnosing and resetting your vehicle’s control modules with the step-by-step guide to resetting your oil monitor. It’s a small effort that provides big insights into your car’s health.
The Hidden Lessons from My DIY Vacuum Leak Hunt
One of the most eye-opening lessons I learned was that sometimes, the simplest tools can reveal the most complex problems. Realizing that dish soap and water could detect tiny vacuum leaks taught me to trust basic methods before jumping to costly diagnostics. It reminded me that patience and attention to detail often outperform expensive equipment in everyday repairs.
Another insight was understanding that small cracks and disconnected hoses often go unnoticed but have outsized impacts on engine performance. This made me more mindful of routine inspections, emphasizing that preventive care can save a lot of headaches—literally and figuratively—down the road.
Lastly, I grasped that being prepared with the right knowledge and tools empowers me to troubleshoot efficiently. DIY repairs aren’t just about saving money; they’re about developing confidence in my vehicle’s health and fostering a deeper connection with my car. These lessons have reshaped how I approach car troubles, making me less anxious and more proactive.
Tools and Insights That Changed My Approach
The core tool that became my game-changer was a reliable OBD2 scanner. It provided instant clarity, helping me confirm the presence of an issue before proceeding. Vital for diagnosing beyond vacuum leaks, this device complements my DIY toolkit, giving me peace of mind.
I also leaned on a good set of hand tools—especially a torque wrench and vacuum pump—that ensure repairs are precise and long-lasting. These investments have made me more self-reliant, reducing dependence on costly repairs and giving me the satisfaction of fixing my car on my own terms.
Additionally, I started using diagnostic software to monitor live engine data. It’s like having a doctor’s appointment for my car, catching issues early before they escalate. This proactive approach has saved me time, money, and a lot of stress.
Your Next Step Towards Confident Repairs
If my experience has sparked your curiosity, don’t hesitate to deep dive into some of the tools and tips I’ve linked above. Remember, effective vehicle maintenance is less about having the fanciest gear and more about understanding your car and trusting your skills. Whether it’s learning how to reset your oil monitor or using simple soap tests, every small step builds your confidence.
Now, I challenge you: When was the last time you trusted a simple, homemade method to solve a car problem? Share your story below—I’d love to hear how DIY techniques have transformed your auto care routines!