I still remember the smell of singed polyester wafting through my old sedan after a stray ash decided to take a permanent vacation on my passenger seat. It felt like a punch to the gut. That one tiny, charred circle seemed to scream neglect every time I opened the door. I tried to cover it with a floor mat for a week, but we both know that is just a band-aid on a bullet wound. If you are staring at a similar crater in your upholstery, do not panic. Whether you are trying to maximize your cars lifespan with regular tune-ups or just trying to keep the cabin looking fresh, a burn hole does not have to be the end of the world. Today, I am going to share the exact method I used to make that eyesore disappear without spending eighty bucks on a professional detailer.
Stop Ignoring That Tiny Charred Hole Before It Grows
Most people think a small burn is just a cosmetic annoyance, but left alone, the fibers around the burn can start to fray and expand. It is a lot like how the danger of ignoring a small rock chip on your windshield can lead to a massive crack. In your interior, that small hole is a gateway for foam degradation. Plus, let us be real: if you ever plan to sell, a burnt seat is the fastest way to lose a buyer’s trust. According to research from Kelley Blue Book, the interior condition is one of the top factors in determining a vehicle’s private party value. I learned this the hard way years ago when I tried to trade in a vehicle and the appraiser spent more time looking at my cigarette burns than the engine. Have you ever had a dealer try to lowball you because of a messy interior?
Can a DIY Repair Actually Look Professional?
I get it—you are skeptical. You have probably seen those repair kits that look like a kindergarten art project gone wrong. My first attempt was a total disaster because I thought I could just use a dab of household super glue and some lint. It turned into a hard, crusty scab that felt like a pebble under my leg. The secret is not just filling the hole; it is about mimicking the texture and color of the original fabric. Just like how collisionfixer restores factory paint depth after a scratch, the goal here is a seamless blend. We are going to use a surgical approach to transplant fibers, and I promise, if you follow these steps, you won’t be able to find the spot five minutes after you are done. While some essential car service tips for safe summer drives focus on the mechanics, keeping the cockpit clean is just as vital for your driving sanity. [image_placeholder]
Gather Your Surgical Tools Before the First Cut
You don’t need a professional workshop to get this right, but you do need precision. Grab a pair of very sharp embroidery or cuticle scissors, a set of fine-point tweezers, and a bottle of clear-drying, flexible fabric glue. Avoid the temptation to use super glue; it dries hard and brittle, which is fine for a plastic trim piece but a nightmare for a seat that needs to flex under your weight. You also need a small scrap of foam or a cotton ball if the burn went deep into the cushion. If you find yourself frequently dealing with interior mishaps or odd noises, like a loose chair rail, checking out the 10 minute fix for a rattling passenger seat can help you tackle all your cabin woes in one afternoon.
Clear Out the Charred Evidence
Your first real action is the scariest: you have to make the hole slightly bigger. Use your tweezers to lift the hard, melted fibers at the edge of the burn. Snip these away carefully with your scissors. I remember the first time I did this on a friend’s lease return; my hands were shaking because it felt like I was sabotaging the car. But if you leave that crunchy, charred ring, the repair will never look natural. You need to reach the soft, clean fabric underneath. This creates a fresh ‘shelf’ for your new fibers to grip. 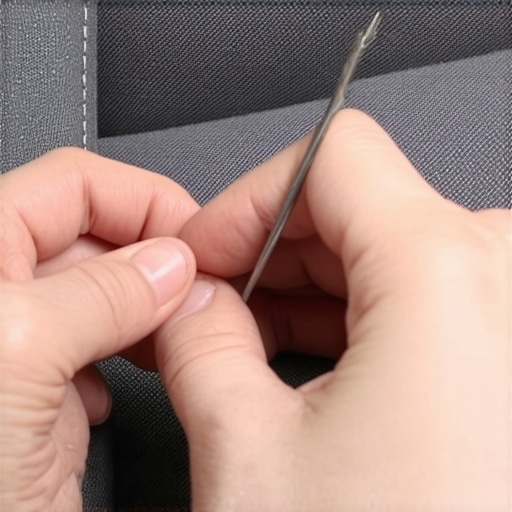
Hunt for Donor Fibers in Hidden Spots
Now for the ‘magic’ part. You aren’t going to find a matching patch at a craft store. Instead, slide your seat all the way forward and look at the bottom of the seat back or along the tracks where the original fabric is stapled to the frame. Use your scissors to gently shave or snip away a small amount of ‘fuzz’ or loose fibers from these hidden areas. You only need a small pile—about the size of a marble. This is the only way to get a 100% color and texture match. It’s a bit like how the trick to popping out a plastic bumper dent with hot water relies on using the material’s own properties to fix the damage rather than adding something foreign.
Apply the Glue Without Making a Mess
If the hole is deep, tear off a tiny bit of foam or cotton and stuff it into the crater until it sits just below the surface. This acts as a foundation so the repair doesn’t sink over time. Then, apply a small drop of fabric glue onto the foam. Use a toothpick to spread it evenly. Much like how to fix a sagging headliner without the mess, the secret is that ‘less is more.’ If you use too much glue, it will soak through your donor fibers and create a hard spot that you’ll feel every time you sit down.
Set the Fibers and Let it Cure
Carefully take your pile of donor ‘fuzz’ and press it into the wet glue with your tweezers. Don’t just dump it on; try to mimic the direction of the surrounding fabric grain. Once it’s in place, use the flat side of your tweezers to gently tamp it down. If you notice other mechanical issues while you’re working in the cabin, it might be one of the top signs your car needs expert auto repair now, but this cosmetic fix is all on you. Let the area dry for at least four to six hours before you sit on it. When you return, the fibers should be bonded firmly, making the original burn almost impossible to spot without a magnifying glass.
While fixing that seat feels like a win, I have seen too many DIYers stop at the cosmetic stuff while their powertrain slowly eats itself. A common myth I hear constantly is that modern cars do not need tune-ups because the computer handles it all. This is a dangerous trap. While it is true we are not gapping points or adjusting carburetors anymore, today’s strategy to maximize your cars lifespan with regular tune-ups involves cleaning sensitive sensors and managing thermal cycles that previous generations never dealt with. According to a study by the Car Care Council, nearly 80% of vehicles are driving around with at least one neglected maintenance task because owners believe the dashboard will tell them everything before it is too late.
Why Does Your Transmission Slip Only When the Engine is Cold?
If you notice your car struggling before the needle hits the middle, it is rarely a hardware failure at first. Often, it is a fluid viscosity issue or a failing sensor. I have seen people pay for full rebuilds when they just needed to address why your transmission slips when the engine is cold. This brings us to the ‘Oops Factor.’ The biggest mistake is using ‘universal’ transmission fluid. Modern gearboxes are designed with specific friction modifiers; using the wrong stuff is like trying to run a marathon in flip-flops. You might move, but you are going to get hurt. Before you let a mechanic talk you into a massive bill, learn how to tell if a transmission shop is lying about a rebuild. Sometimes, a simple flush and the correct synthetic blend are all you need, provided you understand the real difference between full synthetic and blends.
#IMAGE_PLACE_HOLDER_C#
The Hidden Ghost in Your Electrical System
Most people assume a dead battery means a trip to the parts store, but in my experience, the one electrical fault that most mechanics misdiagnose as a dead battery is actually a simple grounding issue. A corroded or hidden ground wire that ruins your sensors can cause ghost codes, rough idling, and even transmission hunting. Don’t let a shop charge you for a new alternator until you have checked the basic continuity of your ground straps. Have you ever fallen into the ‘universal part’ trap and ended up with a bigger headache? Let me know in the comments.
I’ve spent a decade under the hood, and if there is one thing I’ve learned, it’s that the ‘average’ driver waits for a noise, while the pro driver looks for a pattern. Once you have mastered that seat repair, you need to start thinking about the mechanical long-game. I never touch a modern car without my Bluetooth OBD-II scanner. Why? Because the ‘Check Engine’ light is often the last stage of a problem, not the first. By monitoring ‘Long Term Fuel Trim’ data, I can spot the small crack in your air intake that kills mpg before it even triggers a sensor code. This is the difference between a ten-dollar part and a thousand-dollar diagnostic nightmare at a dealership. 
My Secret Gear for Catching Problems Before They Cost Five Grand
I personally use a high-end multimeter to track down how to find a parasitic battery drain with a simple multimeter because it reveals the health of the charging system long before it strands me at a grocery store. This level of precision is exactly what the secret to longevity for high mileage engines is built on. It isn’t magic; it’s just data. Many DIYers overlook the importance of specific specs. For instance, the 2023 Technical Bulletin from the Car Care Council emphasizes that modern aluminum blocks are far more sensitive to coolant pH levels than the cast iron engines of the 90s. This is why the best way to clean your engine bay without shorting wires also involves a visual check of your plastic coolant reservoirs for any hairline fractures or discoloration.
How do I maintain my transmission and engine health over the long haul?
The answer is a mix of consistency and refusing to use sub-par materials. I’ve seen owners destroy their rotors because they didn’t know the truth about cheap aftermarket brake pads. They save twenty bucks at the counter and lose five hundred in premature wear. The same philosophy applies to your gearbox. If you understand how transmission overhauls save you money in the long run, you realize that a two-hundred-dollar fluid swap is an investment, not a chore. Looking ahead, I predict we will see more ‘Digital Twin’ technology in consumer vehicles, where your car’s computer simulates wear and tear to tell you to change fluids based on actual friction rather than just mileage. Until then, you have to be the computer. Don’t let your car become a ‘junk’ statistic simply because you ignored a vibration. Even if things look grim, you can find how we pushed a charlotte junk car offer from 400 to 1000, but I’d much rather you keep your daily driver on the road for another decade. Grab a bottle of mass airflow sensor cleaner this weekend and give your intake a five-minute spray; it is the easiest way to feel an immediate difference in throttle response and idle stability.
What I Learned After Fixing Dozens of Charred Seats
Over the years, I have realized that the biggest hurdle in DIY auto repair isn’t the difficulty of the task; it is the fear of making it worse. When I first started patching cigarette burns, I was terrified I’d end up with a seat that looked like a quilted mess. One ‘lightbulb moment’ for me was realizing that the texture of the donor fibers matters more than the exact pigment—if you get the ‘fuzz’ to stand upright like the original pile, the eye naturally fills in the color gaps. Another hard-earned lesson: always do your repairs in indirect sunlight. Harsh midday sun hides the subtle shadows of a poorly blended patch, only for it to jump out at you the next morning. Finally, remember that fixing these small interior details is just as satisfying as a major car service; it changes how you feel every time you get behind the wheel.
The Gear That Makes My Life Easier Under the Hood
If you are serious about keeping your ride in top shape, you need more than just a basic toolbox. I swear by Aleene’s Flexible Fabric Glue for interior work because it stays soft and never cracks. For the mechanical side, I never go without a BlueDriver Bluetooth Scan Tool. It has saved me thousands by identifying top signs your car needs expert auto repair now before I am stranded. I also recommend a Fluke Multimeter for tracking down electrical ghosts. These tools turn guesswork into science, especially when you are trying to figure out how transmission overhauls save you money in the long run by catching early slippage. If you want to keep the cabin quiet, a simple roll of automotive felt tape is the secret to how to stop a dashboard rattle for under 5 dollars.
Take the First Step Toward a Flawless Ride
You don’t need a degree in mechanical engineering to take pride in your vehicle. Whether you are performing a complex tune up or just snipping away a burnt fiber, every small action adds years to your car’s life. Don’t wait for a major breakdown like the sign your ball joints are about to snap to start paying attention. Your car is an investment, and with a little patience and the right car service habits, it will stay reliable for hundreds of thousands of miles. You have got the knowledge now—it is time to get your hands dirty and make that interior look new again. Have you ever tried a ‘surgery’ on your upholstery and found a better way to source donor fibers? Let me know in the comments below!