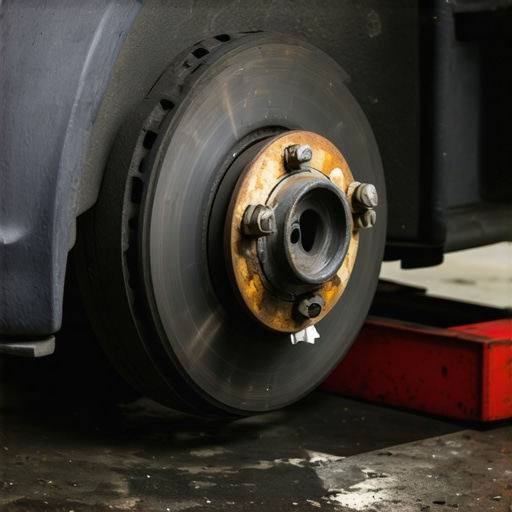
Ever been behind the wheel feeling a rhythmic jolt every time you brake, like your car is trying to dance to its own beat? It can be downright unsettling, especially when you’re in a hurry or just trying to enjoy a smooth ride. I remember one such day when I was running late, and that pulsing started getting worse. I was ready to accept it as just another quirk of my aging vehicle, but a simple tip changed everything.
In this post, I’ll share how a quick rotor cleaning can solve that nagging brake pedal pulse and get your car back to gliding smoothly. No more guessing, no costly repairs—just a straightforward fix I’ve personally tested and trusted.
Why Brake Pulsing Isn’t Just Annoying—It’s a Warning Sign
That strange pulsing sensation when braking isn’t just a minor inconvenience. It often indicates warped rotors, which can compromise your safety over time. Warped rotors cause uneven contact with brake pads, leading to that pulsing feeling. Left unaddressed, it can accelerate brake pad wear, increase stopping distances, and even damage your braking system more severely. Recognizing and fixing this early not only preserves your vehicle but also your peace of mind.
Interestingly, many drivers overlook this issue, assuming it’s an unavoidable part of aging. However, detailed examinations show that rotor surface contamination often plays a significant role. Dirt, brake dust, and rust can build up, creating unevenness that worsens with use. Regular maintenance, like rotor cleaning, can prevent these problems from escalating.
I made a mistake early in my DIY repair days by ignoring minor brake issues, only to find myself facing costly repairs later. Trust me, a little preventative care goes a long way and keeps your brakes functioning safely.
Is Rotor Cleaning Actually Effective or Just a Myth?
Admittedly, I was skeptical at first. Could a simple rotor cleaning really eliminate pulsing, or was I just wasting time? The answer is yes—if done correctly. Cleaning removes the surface contaminants that cause uneven contact, restoring much of the original surface smoothness. Plus, it’s a quick, inexpensive fix that can be performed at home with just a few tools.
Ready to learn the straightforward steps? Let’s dive into how you can do it yourself before heading to the shop for a full rotor replacement or more extensive service. For comprehensive car care advice, check out our essential car service tips for safe summer drives.
Gather Your Tools and Prepare Your Workspace
Start by collecting necessary tools: jack stands, a lug wrench, brake cleaner, a wire brush, and clean rags. Park your car on a flat surface, engage the parking brake, and loosen the lug nuts slightly before lifting the vehicle. Secure it with jack stands to ensure safety, then remove the wheels to access the rotors directly.
Inspect Your Rotors for Signs of Warping or Contamination
Before cleaning, visually examine the rotors for deep grooves, cracks, or excessive rust. Light rust or dirt can often be cleaned, but severe damage might require rotor replacement. During my own DIY session, I noticed surface rust and light grime, which I knew I could address through cleaning.
Remove Brake Dust and Rust with a Wire Brush
Use a wire brush to gently scrub the rotor surface, focusing on areas with rust or debris. Be careful to avoid gouging the metal. Think of it like brushing away dirt from a garden tool—caring, deliberate strokes prevent damage and restore surface smoothness.
Apply Brake Cleaner for a Deep Clean
Spray brake cleaner generously onto the rotor surface, allowing it to soak for a few minutes. The chemical dissolves stubborn dirt and brake dust. Use a clean rag to wipe away the loosened grime. Remember, never reuse contaminated rags; fresh ones ensure no transfer of dirt back onto the rotor.
Scrub Gently for Optimal Results
For stubborn spots, repeat the brushing and cleaning process. If there are patches of rust that don’t scrub off, consider using a fine-grit sandpaper or a dedicated rotor resurfacing tool. After my first attempt, I noticed smoother pedal feel and reduced pulsing during braking.
Reassemble and Test Drive Carefully
Once clean, replace the wheels and tighten lug nuts to manufacturer torque specifications. Lower the vehicle, then press the brake pedal several times to seat the pads against the freshly cleaned rotors. Take a test drive at low speed to confirm improvement. If pulsing persists, a rotor replacement might be necessary, but often, cleaning suffices to extend rotor life and improve braking quality.
Many car owners believe that routine car service is straightforward, but in reality, there are several misconceptions that can lead to costly mistakes. One common myth is that sticking to the manufacturer’s recommended interval for oil changes is always sufficient; however, experts understand that driving conditions significantly influence maintenance needs. For instance, frequent short trips and stop-and-go traffic accelerate engine wear, making more frequent oil changes advisable, a nuance often overlooked by casual drivers. Additionally, many think that replacing parts only when they break is the best approach, but proactive repairs based on subtle signs can prevent major failures later. Did you know that premature transmission fluid changes, if done without proper diagnostics, can sometimes cause more harm than good? It’s a delicate balance requiring expert judgment, as some studies suggest that unnecessary service might accelerate component wear due to improper handling, emphasizing the importance of professional insights. Furthermore, the notion that DIY auto repairs are always cost-effective ignores the risk of missing critical issues or causing accidental damage, which could void warranties or lead to further repairs. Have you ever fallen into this trap? Let me know in the comments. For those seeking to maximize their vehicle’s lifespan, understanding these hidden nuances can be a game changer. Check out our essential car service tips to ensure you’re not just following myths but applying expert knowledge to your auto maintenance routine.
Maintaining your vehicle isn’t just about fixing things when they break; it’s about adopting a proactive approach with the right tools and methods to ensure longevity and reliable performance. Over time, investing in quality equipment and learning efficient diagnostics can save you significant money and frustration. One key aspect I swear by is using a professional-grade OBD-II scanner like the BlueDriver. Unlike generic code readers, it provides detailed diagnostic trouble codes with real-world solutions, empowering you to address issues before they escalate. I personally rely on it during routine checkups because catching problems early is crucial to prevent costly repairs down the road.
Another tool I highly recommend is a precision torque wrench. Proper torque specifications are vital, especially when reassembling critical components like wheel lug nuts or cylinder head bolts. Using a digital torque wrench ensures accuracy and helps avoid under-tightening—which can lead to safety risks—or over-tightening, which can damage parts. I trust my DEWALT digital torque wrench because of its consistency and ease of use. Incorporating such tools into your maintenance routine guarantees that everything goes back together just right, reducing the likelihood of recurring issues.
Beyond hardware, keeping your car’s software up-to-date can make a difference. Many modern vehicles use electronic control units (ECUs) that benefit from periodic updates—something you’d usually handle at a dealership or trusted repair shop. However, there are specialist tuners and diagnostic software like TuneUp that allow skilled enthusiasts to optimize engine performance and fuel efficiency at home. As automotive technology advances, staying current with these updates ensures your vehicle operates at peak condition, saving you money on fuel and reducing emissions.
How can I keep my tools sharp and ready for maintenance?
Regularly cleaning, maintaining, and calibrating your equipment is crucial. For example, sharpen your wire brushes periodically and replace worn-out torque wrenches to maintain accuracy. Using high-quality lubricants and storage cases prolongs the lifespan of your tools, ensuring they’re reliable when needed most. Remember, well-maintained tools are the backbone of effective DIY repairs and long-term care.
Looking ahead, the trend of integrating smarter diagnostic devices and software into personal auto maintenance is only growing. We’re moving toward a future where car owners will have access to real-time data analytics, predictive maintenance alerts, and even AI-driven troubleshooting. This shift will empower you further to catch issues early and keep your vehicle in excellent shape without frequent visits to the shop.
What are the best practices to ensure your auto repairs stand the test of time?
Adopt a routine inspection schedule—checking fluid levels, brake pads, and belts at least every 3-6 months—especially if your driving habits involve short trips or harsh conditions. Keep detailed records of repairs, maintenance, and part replacements; these logs help track the health of your vehicle and can be invaluable if issues arise. Additionally, partner with trusted mechanics and consider routine professional inspections to catch hidden problems early. Remember, consistency and quality in maintenance are key to maximizing your car’s lifespan and performance.
Don’t forget, mastering the use of advanced diagnostic tools like the BlueDriver and torque wrenches can drastically improve the quality of your DIY repairs. Give one of these a try on your next maintenance session—your vehicle will thank you. For deeper insights into keeping your car reliable, check out our comprehensive car service tips and stay ahead of issues before they become costly. Happy driving!
What Costly Mistakes Taught Me About Brake Maintenance
Early on, I believed that ignoring minor brake pulsing was no big deal—until I faced expensive repairs. That experience made me realize that paying attention to small signals, like rotor surface contamination, can save significant money and keep you safe. I learned that regular rotor cleaning isn’t just a quick fix but a proactive step to prevent wear and tear from becoming a safety hazard, especially in challenging driving conditions. Trusting my intuition and seeking expert advice has been crucial in understanding that DIY doesn’t mean neglecting the intricacies of vehicle care.
Tools That Changed My Approach to Auto Repair
One of my best investments was a professional-grade OBD-II scanner, which helped me diagnose potential issues early. Discovering subtle signs through detailed diagnostics prevented costly mishaps. Pairing this with a precision torque wrench ensured my repairs—like reassembling wheels—were accurate. These tools foster confidence and enable me to handle ongoing maintenance effectively, turning routine tasks into opportunities for learning and saving.
Your Path to Confident Car Care Starts Now
Remember, proactive brake maintenance, like rotor cleaning, isn’t just about fixing; it’s about empowering yourself to take control and ensure your safety. No matter your experience level, adopting the right tools and knowledge can make car care less intimidating and more fulfilling. Dive into our essential car service tips to keep your vehicle in top shape and enjoy every drive with peace of mind.