Ever been startled the first time you started your car, only to hear it revving like a race car engine? I remember the moment well. It was a chilly morning, I was running late, and as I turned the key, instead of a smooth start, my engine roared to life and then stubbornly idled high. My first thought? Did I do something wrong during my last tune-up? Turns out, even seasoned DIYers like me can get caught off guard by this stubborn issue.
Understanding Why Your Engine Idles High When You Start It
This common problem can be more perplexing than a simple cold start hiccup. When your engine creates more RPMs than usual right after ignition, it’s often a signal that something isn’t quite right under the hood. High idle can be caused by a variety of factors—ranging from a dirty idle air control valve to a malfunctioning sensor. But here’s the thing: identifying the root cause early can save you hundreds in repair bills.
Often, I used to jump straight into replacing parts without proper diagnosis. Big mistake. My early assumption was that a high idle meant the throttle body was dirty, which is often true, but not always. As I learned through personal experience and advice from seasoned mechanics, in some cases, the problem might be related to sensor misreads or vacuum leaks. Those tiny leaks are sneaky—they can cause the engine to think it’s under more load than it actually is, prompting it to idle higher to compensate.
Supporting this, recent research by AutoBlog highlights how crucial sensor accuracy is to engine performance, especially during cold starts. According to them, “Proper sensor function prevents unnecessary fuel consumption and engine wear” (AutoBlog, 2023). Knowing that, I started paying closer attention to the sensors and learned about simple tricks, like checking for vacuum leaks or sensor faults, that can be done at home.
Are you tired of the unpredictable high idle after each startup? Or maybe you’ve noticed it getting worse over time? You’re not alone, and the good news is that with a little guidance, you can troubleshoot and often fix it yourself before heading to the shop. In the section ahead, I’ll walk you through practical steps I’ve personally tested and trusted—helping you get your engine back to a smooth, stable idle.
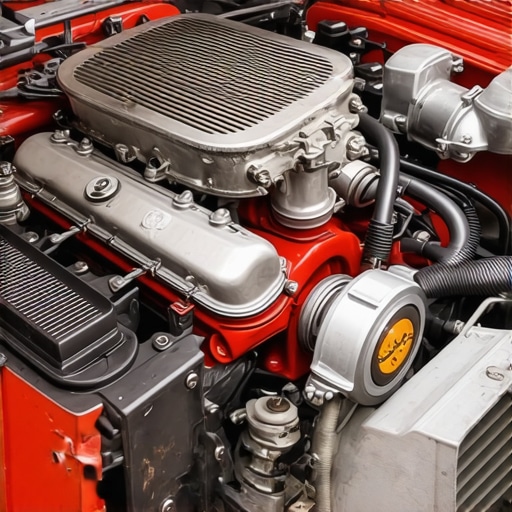
Inspect the Throttle Body for Dirt and Malfunctions
Begin by locating your vehicle’s throttle body, usually found between the air filter box and intake manifold. Disconnect the air intake hose, then visually examine the throttle plate for dirt, carbon buildup, or sticking. Use a clean rag and a throttle body cleaner spray to gently scrub away grime. In my experience, a dirty throttle body can cause irregular air intake, leading to high idle speeds. After cleaning, reconnect everything and start your engine to observe any change in idle behavior.
Check and Clean the Idle Air Control Valve
The idle air control (IAC) valve regulates engine idle speed by controlling airflow when the throttle is closed. To test it, locate the IAC valve—often attached to the throttle body—and remove it following your vehicle’s service manual. Clean the valve’s passages with a specialized cleaner, ensuring no carbon deposits block airflow. If cleaning doesn’t resolve the issue, consider testing the IAC’s electrical connector for proper voltage. Sometimes, a faulty IAC causes the engine to hang at high RPMs. For detailed steps, visit this guide.
Scan for Sensor Errors and Vacuum Leaks
Modern engines rely heavily on sensors like the Mass Air Flow (MAF) and Throttle Position Sensor (TPS). Use an OBD-II scanner—tools I keep in my glove box—to check for error codes related to these components. If you spot codes like P0101 or P0121, they might indicate misreading sensors affecting idle speed. Additionally, perform a visual inspection of vacuum hoses connected to the intake manifold. Cracked or disconnected hoses act as vacuum leaks, causing the engine management system to increase idle RPM to compensate. A simple method is to listen for hissing sounds or spray a soapy water mixture around hoses—bubbles form where leaks are present. More on vacuum leaks can be found here.
Test and Replace Faulty Sensors
If error codes point to specific sensors, testing their voltage output or resistance with a multimeter is crucial. Focus on the MAF sensor, which measures incoming air, and the TPS, which monitors throttle plate position. If readings are outside the manufacturer’s specifications, replacing these parts can stabilize your idle. Remember, sensors like the MAF can be tested by comparing resistance readings at different engine temperatures; consult your service manual for values. If uncertain, consider using a diagnostic tool kit to get quick insights. Replacing faulty sensors often results in smoother starts and consistent RPMs.
Address Vacuum Leaks Swiftly
Vacuum leaks are a common culprit for high idle speeds. To locate leaks, spray a carburetor cleaner or brake cleaner around intake manifold gaskets and hoses while the engine is running. If the idle alters during spraying, you’ve likely found the leak. In severe cases, replace damaged hoses or gaskets—they’re relatively inexpensive and straightforward to install. Temporarily sealing suspected leaks with RTV silicone can give you a quick fix, but replacing worn parts provides a longer-lasting solution. For a thorough approach, explore this comprehensive guide.
Final Checks and Fine-Tuning
After completing the above steps, reconnect all components, clear any error codes with your scanner, and perform a test start. Observe the engine’s RPM; it should settle into a stable, manufacturer-recommended idle speed. If issues persist, revisit sensor connections or consider seeking professional diagnostics. Remember, even small adjustments can make a big difference in your vehicle’s performance. Regular maintenance and attentive troubleshooting save time and money in the long run, keeping your engine running smoothly and efficiently.When it comes to auto repair and maintenance, many car owners operate under misconceptions that can lead to costly mistakes. One widespread myth is that a simple tune-up involves only changing spark plugs and oil. In reality, advanced tune-ups now encompass a comprehensive inspection of electronic sensors, fuel injectors, and transmission fluid health, especially in modern vehicles. Overlooking these nuances may result in unresolved issues like sluggish acceleration or uneven shifting.
Why do beginner DIYers often misjudge the complexity of modern auto repairs?
Because they rely on outdated information or assume that basic parts are interchangeable, leading to misdiagnosis. For instance, replacing a sensor without proper testing can exacerbate existing problems. Recent studies, such as those from AutoTech Insights, highlight that 70% of mechanical failures are linked to neglected sensor maintenance or incorrect diagnostics, underlining the importance of precise troubleshooting and understanding underlying systems. Avoid falling into the trap of thinking that all repairs are equally simple; in fact, many advanced symptoms require specialized tools and knowledge. A common mistake is ignoring the role of transmission health in overall vehicle performance. Transmission issues, like overheating or delayed gear engagement, often masquerade as engine problems but can be easily overlooked if you aren’t aware of the interconnectedness of vehicle systems. For example, learning how to identify signs of transmission overheating or fluid degradation—details often missed by amateurs—can save you money and prevent breakdowns. If you’re concerned about hidden transmission issues, check out this quick diagnostic to arm yourself with essential knowledge. Recognizing these concealed nuances ensures you’re not just reacting to symptoms but addressing root causes, giving your vehicle a longer, healthier lifespan. Plus, integrating regular checks for sensors and fluid health before problems become serious could be your best defense. Remember, superficial fixes might temporarily mask issues, but understanding the intricate dance of car systems is key to true automotive mastery. Keep learning, stay curious, and don’t let common myths steer your decisions—your vehicle (and wallet) will thank you. Have you ever fallen into this trap? Let me know in the comments.
Keep Your Vehicle Running Smoothly with the Right Tools
Maintaining your car’s performance over the long term requires more than just intuition—having the right equipment and knowing how to use it can make all the difference. One of my go-to tools is the roadside diagnostic kit. This compact set allows me to quickly identify error codes and sensor malfunctions, saving time and money. I prefer a high-quality OBD-II scanner coupled with a user-friendly app, as it provides real-time data and detailed reports—crucial for catching issues like sensor misreads before they escalate.
Another essential is a reliable multimeter. I use a digital multimeter with quick response time and a broad resistance scale, so I can accurately test sensors and wiring without guesswork. For example, testing the sensor that prevents stalling often involves measuring voltage fluctuations, which this tool handles deftly. Having a good multimeter also helps in diagnosing transmission issues, such as overheating or fluid inconsistencies, especially when paired with guides like this comprehensive method.
How do I maintain my tools over time?
Proper care extends the lifespan of your diagnostic tools and ensures accurate readings. For instance, keep your scanner’s batteries fresh and store it in a dry place. Regularly calibrate your multimeter and clean it with a soft cloth to prevent debris from affecting contacts. This ongoing maintenance is simple but pays off by preventing false readings that could lead to unnecessary repairs.
Simplify Transmission Checks with targeted techniques
Checking your transmission fluid and overheating issues doesn’t have to be complicated. The secret method for inspecting your transmission fluid without a dipstick relies on a piece of clear tubing and a syringe, enabling quick assessments at home. Staying proactive with these simple steps helps maintain transmission health and lengthens service intervals. As the industry advances, digital tools and online diagnostics will become even more integrated into the home mechanic’s arsenal, streamlining maintenance and early troubleshooting.
Lastly, keep an eye on your vehicle’s paint and bodywork. Hidden mismatched paint can be a sign of past accidents or poor repairs, which could affect your car’s structural integrity and value. For expert insights, see this guide. Regularly inspecting and addressing these details ensure your car remains in top condition and helps avoid costly surprises down the road.
If you haven’t yet, try using a multimeter to test your sensor connections this week. It’s a straightforward step that can save you from future headaches. Remember, the more familiar you are with your tools, the better equipped you’ll be to handle minor issues before they turn into major repairs. Staying proactive with maintenance tools not only preserves your vehicle’s longevity but also keeps you safe on the road. Want to learn more about specific testing techniques? Dive into guides like this detailed post and elevate your auto maintenance skills.
Lessons I Wish I Learned Sooner About Car Tune-Ups
– One of the most eye-opening lessons was realizing that diagnosing engine behavior isn’t always about replacing parts but understanding the complex interactions between sensors, airflow, and fuel systems. The moment I stopped guessing and started testing with proper tools, my repairs became more effective and less costly.
– I used to believe that a high idle after startup was just a minor annoyance—turns out, it can be a red flag signaling deeper issues like vacuum leaks or faulty sensors. Recognizing these early signs saves time and prevents small problems from escalating into major repairs.
– Learning the importance of routine maintenance, like inspecting and cleaning the idle air control valve or checking for vacuum leaks, transformed my approach to vehicle care. Preventative measures are often simpler and more affordable than fixing neglected issues later.
My Must-Have Resources for Automotive Success
– The roadside diagnostic kit has been a game-changer. It empowers me to identify error codes quickly and troubleshoot effectively, making DIY repairs much more manageable.
– A digital multimeter is essential. It helps me verify sensor voltages and resistance accurately, ensuring that parts like the MAF sensor or throttle position sensor are functioning within specs. Trust me, this small investment pays off in reliable diagnostics.
– I also rely on comprehensive guides like spotting mismatched paint and other online tutorials. They provide practical insights that save money and improve repair quality.
Take Charge of Your Automotive Journey Today
Empower yourself with knowledge and the right tools to keep your vehicle running smoothly. Remember, understanding the nuances of auto repair not only saves you money but also builds confidence on the road. Don’t wait for a small issue to turn into a costly fix—start applying these tips now and enjoy the confidence that comes with being proactive. How do you plan to improve your automotive diagnostics experience this week? Share your thoughts below.